THE SHORT VERSION
Keep the product facing the camera, ask for one slow push-in and check the label and package shape against the approved image throughout the clip.
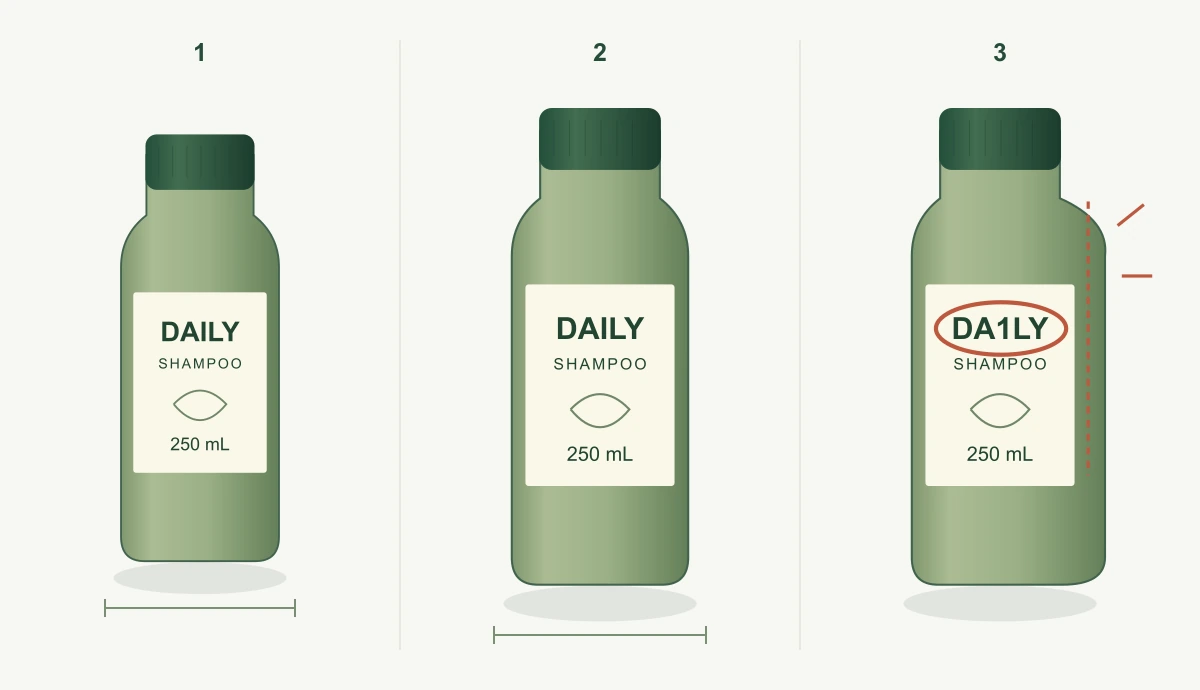
Panel 1 is the reference. Panel 2 enlarges the same package without changing its proportions. Panel 3 deliberately changes DAILY to DA1LY and widens the right shoulder; the dashed line marks the expected edge. This inspection diagram shows defects to reject.
Illustration: AI Creator Tool ReportStart with an approved packshot and ask for one slow camera push-in. Keep the product still and the label facing the lens. Before approving the clip, compare the first, middle and last frames with the original, then watch the whole shot. A label can look right at the start and change when the camera moves closer.
Set the packaging requirements before generating
Choose the exact SKU and packaging version. Use a sharp, front-facing image that shows the full outline, with room around the cap, sides and base. Open it at the intended delivery size. If the required text is already unreadable there, ask for a clearer asset or adjust the layout before spending credits. A model can invent plausible letters in a blurred area.
Mark what the approver must see. For a bottle, that might be the brand name, the variant line, the cap profile and the shoulder shape. Add the pack size or any wording that must be legible for this placement. Use the approved image as the comparison reference and record which edge or line of text belongs on the checklist.
Choose the delivery aspect ratio and the shortest duration that serves the edit. Leave room for a headline added later in your editor. If the brief requires an angle absent from the packshot, get an approved image of that side or use a controlled 3D render. A front view gives the model little evidence about the rest of the pack.
Copy this motion brief
Higgsfield’s Cinema Studio guide shows how to add a product reference and choose a camera move. Use the approved packshot as the image input. Set the ratio and duration in the interface where available. If you select a movement preset, match it to the prompt.
Create a short hero shot from the supplied product image. Move the camera slowly and straight toward the product. Keep the product stationary, front-facing and fully visible. Preserve the exact label spelling, label placement, package outline, cap shape, colors and number of units. Keep the label in focus and readable throughout. Leave the planned headline area clear. No rotation, hands, opening, pouring or added text.
Set the headline area to a specific side in the prompt if your layout already defines it. Save the source filename, prompt, selected model and settings with the take. That gives the next editor enough information to repeat the brief and change one variable.
Check the label and outline frame by frame
In the three-panel inspection diagram, the approved packshot is the reference. Compare it with the panel that retains the label and outline, then find the lettering and silhouette changes in the panel marked for rejection. The diagram illustrates the review decision. The same comparison applies to frames you pull from your own clip.
Put the source beside the first, middle and last frames of your export. Read the brand and variant letter by letter at delivery size. Compare the label position, cap, shoulders and base. The pack will grow in the frame during a push-in. Compare proportions at a matched scale when judging whether the shape changed.
Play the entire clip once at normal speed. Then scrub wherever reflections cross the type or the outline seems to wobble. Record the first time you can see a defect and name the feature that changed, such as the cap widening halfway through the shot. Review the actual export so the check includes any crop or scaling applied in the edit.
Record a decision for each take
| Finding | Decision and next step |
|---|---|
| Letters change, the label shifts or the package deforms | Reject. Try a smaller move. If the defect persists, use the approved still or a controlled 3D render in an editor. |
| The crop hides required information | Revise the framing. Give the source more room and check the delivery ratio before generating again. |
| The package passes but the background or light needs work | Revise one of those settings. Keep the same source and move so you can judge the effect. |
| The package passes but the shot feels too static | Keep the passing take. Compare it with one slightly stronger push-in and review the new clip in full. |
| The packaging and placement pass throughout the export | Approve the specific file. Log its filename, reviewer and approval date. |
Keep a row per attempt with its settings, cost, decision and defect timestamp if applicable. Include rejected attempts in the spend when you use the cost-per-usable-output calculator. If the team must ship with exact packaging and the retries still change it, animate the approved still with a simple scale move or use the controlled render. Put any headline or offer copy on its own layer in the editor.