THE SHORT VERSION
Use Photopea for a contained image-finishing task. ArtCraft’s PhotoCraft and VectorCraft belong to a different, developing suite; choose by the required edit and verify the saved result.
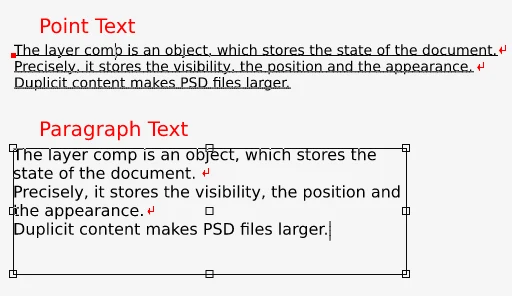
Photopea manual compares point text with a fixed paragraph text box.
PhotopeaA generated campaign image becomes usable when the wording, layout and exported file match the brief. For one asset, a free browser editor can handle ordinary layers, text and resizing without another generation round. Keep the original image, replace unreliable lettering with editable type and save a layered master before exporting. The worked specification below is fictional and can be adapted to an image you own.
Choose the editor by the task
The official ArtCraft directory identifies PhotoCraft as an image editor in early alpha and VectorCraft as vector illustration software in development. These are the Crafting Apps, distinct from similarly named independent websites and from a claim that an entire commercial suite has been replaced. A product category does not establish compatibility with your particular layered file, font or export requirement.
For this task, Photopea’s manual documents browser editing, layers and image dimensions. It is the practical alternative used for the instructions below. Use this repeatable editing plan to check whether an editor meets your file requirements. If you explore that suite later, use a disposable copy and compare its exported file against the same acceptance checklist.
Write the delivery specification first
Use this small asset brief before opening an editor. The dimensions are an example for this exercise, not a universal platform requirement. Obtain the actual placement specification from the person publishing the campaign. Exact approved copy should live outside the image as well, so a reviewer can compare spelling and punctuation without guessing.
| Item | Fictional exercise specification | Pass condition |
|---|---|---|
| Canvas | 1080 × 1350 pixels | Export has those dimensions |
| Headline | Weekend workshop | Wording matches the brief |
| Supporting line | Bring one idea | Readable at viewing size |
| Master and delivery | Layered PSD plus PNG | Both reopen correctly |
Repair the image without baking in the next mistake
Open a duplicate of the generated image. Inspect faces, hands, packaging and any visible signs before adding copy. If an error affects the product or changes the meaning, choose a better source or return to the generation stage. A decorative overlay cannot make an inaccurate product representation truthful. Our image-first brief guide helps when the source needs to be rebuilt.
For unwanted generated lettering, crop it away when the composition allows. Otherwise place an opaque panel over the whole lettering area, including stray character fragments. Use a panel that belongs to the design rather than patching each letter with an approximate background color. Preserve enough empty space for the new headline and make sure the panel does not hide important product detail.
Add real type and preserve the layout
Create a separate Type layer for each text role. Photopea’s text documentation distinguishes point text from paragraph text: a paragraph box is useful when a supporting line should wrap within a fixed width. Paste the approved wording, choose a font you are entitled to use and check its accented characters or non-Latin glyphs. Confirm the type edit before selecting another layer.
Name the layers by purpose: source, cover panel, headline and supporting line. Keep the headline away from the edge and inspect the arrangement at the approximate size people will see it. If the words only work while zoomed in, shorten the copy or change the layout. A later resize deserves another visual review; our campaign resizing workflow explains that separate decision.
Save the master, then verify the delivered file
Use File > Save as PSD for the editable master, then File > Export As for the delivery format described in Photopea’s saving guide. Check dimensions using the image-size controls. Changing pixel dimensions and changing the canvas are different operations: one resamples the artwork, while the other changes the working area. Avoid enlarging a small image and assuming it gained authentic detail.
Reopen the exported PNG outside the editor and compare it with the brief: exact text, intended crop, readable contrast, correct dimensions and no leftover generated letters. Reopen the PSD too and confirm that text remains editable. Store both beside the original, with a version and approval state in the filenames. Stop when the requested asset passes those checks; broader suite comparisons can wait until a real production requirement calls for them.